QUICK START: DSX Off-Premise IP Keyset using NAT Traversal

Additional Feature Information
VoIP Extensions
Programming for this Feature
VoIP Readiness Test Tools
QUICK START: DSX On-Premise IP Keyset
QUICK START: DSX Off-Premise IP Keyset using VPN
QUICK START: DSX IP Adapter (IPA)
QUICK START: Setting up the X-Lite Soft Phone

How to Set Up an Off-Premise DSX IP Keyset using NAT Traversal

NAT Traversal Basics

If you have an NEC-recommended SIP-aware compatible router installed at the remote site (currently the Linksys WRT54GL or WRT160NL), you can connect the DSX IP Keysets at the remote site without the need for a VPN.


Consult an IT Professional
Setting up DSX Remote IP Keysets using NAT Traversal requires the purchase of a compatible router for each remote site. Additionally, port 5060 at the system-side router must be forwarded to the system private IP address. Depending on your experience level, this may require the services of an IT professional.
Incorrectly configured port forwarding can pose a security risk.
NEC Technical Services cannot assist you with your NAT Traversal setup. If you do not have IT expertise, always consult a trained IT professional. Optionally, you may be able to call the router manufacturer for installation and troubleshooting support.

To set up NAT Traversal:
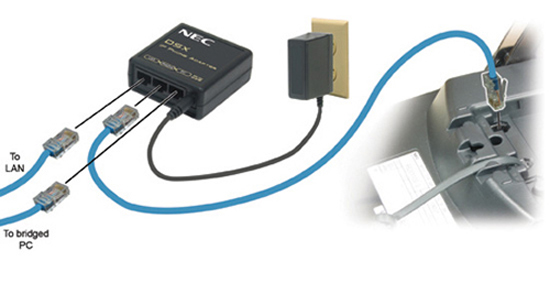
  1. Install a compatible router at the remote location.
    • The LAN side of the remote router connects to the IP keyset.
    • The WAN side of the remote router connects to the public internet.
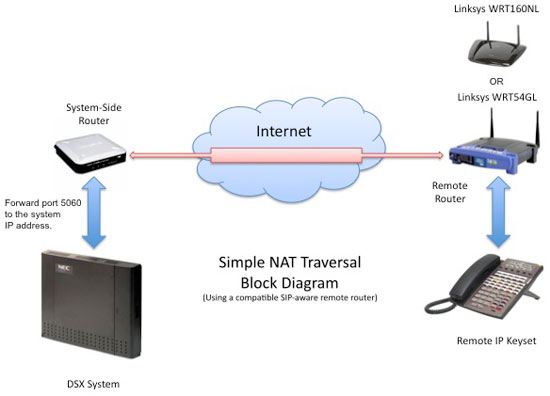
  2. Install another router at the system location.
    • The LAN side of this router connects to the system.
    • The WAN side of this router connects to the public internet.
    • You do not have to install a SIP-aware compatible router at the system location.
  3. In the system-side router, port forward port 5060 to the system's IP address.
  4. Verify that RTP ports in the system side router that correspond to the system's RTP port range are not given any special treatment. Normally, this is ports 1024-1088.
  5. When setting up the SIP server address in the remote IP keyset, enter the WAN address of system-side router. Do not enter the system's private IP address. See DSX IP Keyset Admin Menu Setup Options for more.

DSX IP Keyset Setup

1. Connect and power-up the keyset.

  1. Following the illustration below, plug the DSX IP Adapter power supply cord into the 48VDC jack on the adapter.
  2. Plug the DSX IP Adapter power supply into a convenient 115 VAC receptacle.
  3. Plug one end of a CAT5 cable into the PHONE jack on the adapter.
  4. Using a separate CAT5 cable, connect the LAN jack on the adapter to the
  5. Plug the other end of the network cable into the LAN jack on the telephone. Do not plug the LAN jack on the adapter into your LAN. That will come later.
  6. Wait about 20 seconds for the IP keyset to initialize and start up.

2. Enter the setup data into the DSX IP Keyset.

  1. When the keyset display shows Connecting or SIP Server Not Found, press HOLD CONF * #.
  2. When you see the setup menu opening screen, enter the setup mode password (necdsx or 632379) + HOLD.
  3. Dial 21 to access the SIP User options.
    1. Dial 1, enter the IP keyset user ID, and press OK.
    2. Dial 2, enter the IP keyset password, and press OK.
      • This is the password you entered for the IP extension in 2106-02: Password [Stations: Config: Setup: VoIP: Password]
      • In the password entry mode:
        • 1 enters 1 and special characters.
        • 2-9 enters upper case letters and the digits 2-9.
        • 0 enters 0 or a space.
        • * is used with the digits 2-9 to switch between upper and lower case letters or to enable the numeric-only entry mode.
        • # enters *, #, and other special characters.
        • VOLUME keys scroll left and right.
        • Del deletes the character to the left of the cursor.
    3. Dial 3, enter the IP keyset extension number, and press OK.
      • This is the same as the User ID entered above.
  4. Press Exit to back up to the setup menu main screen.
  5. Dial 21 and enter the IP address of the system to which the keyset should connect + OK.
  6. Press Exit twice + Save to save the data you just entered into the keyset.
    • The DSX IP Keyset with automatically reset.
    • After about 30 seconds, the IP keyset will register with the DSX system and begin to operate normally.